XAML in Xamarin.Forms 基礎篇 電子書

XAML in Xamarin.Forms 基礎篇 電子書

Xamarin.Forms 快速入門 電子書

Xamarin.Forms 快速入門 電子書
顯示具有 Xamarin.iOS 標籤的文章。 顯示所有文章

2019/06/05

Xamarin.Forms 的背景執行緒在 Android / iOS 背景模式下的執行情境測試

Xamarin.Forms 的背景執行緒在 Android / iOS 背景模式下的執行情境測試

對於已經具備擁有 .NET / C# 開發技能的開發者,可以使用 Xamarin.Forms Toolkit 開發工具,便可以立即開發出可以在 Android / iOS 平台上執行的 App;對於要學習如何使用 Xamarin.Forms & XAML 技能,現在已經推出兩本電子書來幫助大家學這這個開發技術。
這兩本電子書內包含了豐富的逐步開發教學內容與相關觀念、各種練習範例,歡迎各位購買。
Xamarin.Forms 電子書
想要購買 Xamarin.Forms 快速上手 電子書,請點選 這裡
想要購買 XAML in Xamarin.Forms 基礎篇 電子書,請點選 這裡


當在進行 Xamarin.Forms 專案開發的時候,必須要能夠了解 Android 與 iOS 應用程式生命週期 Application Life Cycle 的特性,最為重要的是,這兩個平台上對於生命週期的運作方式是不太相同的。原則上,所有的行動裝置應用程式都會分成前景、背景兩種模式,所謂的前景 Foreground 模式,就是該應用程式顯示在螢幕上,而背景 Background 模式,就是這個應用程式無法顯示在螢幕上,因為現在螢幕需要顯示其他應用程式的內容,關於這部分的詳細介紹,可以參考 Android 活動開發週期 與 iOS 中的背景處理簡介 這兩份文件。
當應用程式一起動的時候,此時這個應用程式將要顯示到螢幕上,就會觸發特定的事件,讓應用程式知道現在應用程式的已經進入到前景模式;而例如,當使用者按下手機上的 Home 按鍵,此時,這個應用程式就會切換到背景模式,當然,也會觸發特定的事件。
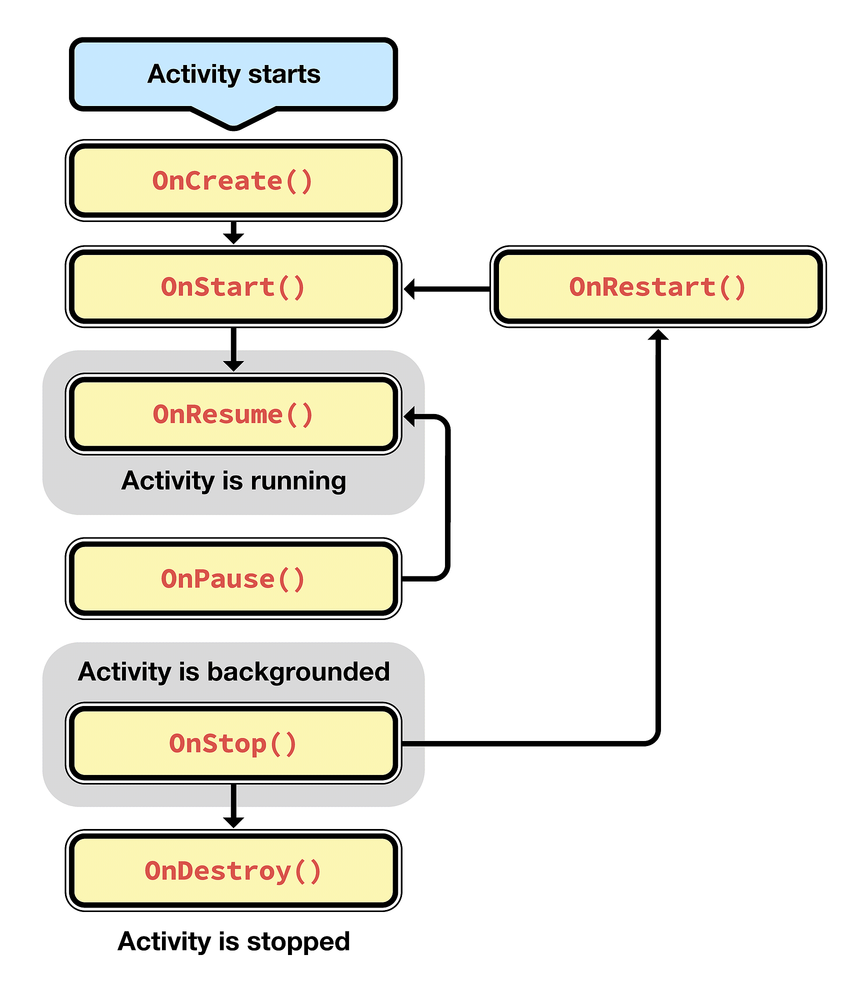
如同前面所說的,在 Android 與 iOS 系統下,會觸發的事件與可以觸發的事件項目都不相同,底下的圖片為 Android 作業系統下的 Activity 的生命週期狀態;當 Activity 建立後,就會觸發 OnCreate 事件,啟動之後,就會觸發 OnStart 事件;當應用程式按下了 Home 按鍵,就會觸發 OnPause的事件,使用者選擇切換到該應用程式,要讓該應用程式重新顯示到螢幕上,此時,將會觸發 OnRestart 與 OnStart 事件。
若現在的作業系統為 iOS ,此時對於應用程式生命週期相關會使用到的事件,將會如下圖。當應用程式啟動之後,將會觸發 OnActivated 事件,此時的狀態名稱為 Running 或者 Active;若使用者按下了 Home 按鍵,將會觸發 OnResignActivation 事件,此時,可以稱進入到 Inactive 狀態下,緊接著會在觸發 DidEnterBackground 事件,進入到 Background / Suspended 模式下;現在若使用者選擇要把這個應用程式讓他回到螢幕上,這個時候,就會觸發了 WillEnterForeground 事件,如下面流程圖。
然而,在 Xamarin.Forms 中,也會有一個應用程式生命週期的運作模式與特定的事件,只不過在 Xamarin.Forms App 生命週期內就簡單多了,在 Xamarin.Forms 內只有三種生命週期事件
  • OnStart - 會在應用程式啟動時呼叫。
  • OnSleep - 會在每次應用程式被移到背景時呼叫。
  • OnResume - 會在應用程式被傳送到背景後又再次繼續時呼叫。
這些事件可以從 Xamarin.Forms 專案內的 App 類別中來訂閱。

測試用的專案範例解說

這裡將會使用底下的 Xamarin.Forms 專案,進行 Android / iOS 兩個平台的不同生命週期狀態下的程式碼執行狀態來了解,在這裡,將會設計一個按鈕,當按下這個按鈕之後,將會執行 60 次的迴圈,每次迴圈將會休息兩秒鐘,並且將計數器變數加一,而該計數器屬性將會透過資料綁定的方式,將這個計數器值顯示到螢幕上。此時,也會使用 Console.WriteLine 方法,將現在迴圈的 Index 值顯示到螢幕上,所以,可以從 Visual Studio 2019 的輸出視窗中看到這個程式是否還有繼續在執行中;另外,這些相關執行日誌內容,也會寫到檔案中,以便當這個程式在實體手機上,不透過 Visual Studio 來執行,也可以看到這些 Log 執行過程內容。
這裡是這個應用程式的 XAML 設定內容。
xaml
<?xml version="1.0" encoding="utf-8" ?>
<ContentPage xmlns="http://xamarin.com/schemas/2014/forms"
             xmlns:x="http://schemas.microsoft.com/winfx/2009/xaml"
             x:Class="XF5007.Views.MainPage"
             Title="背景執行緒與背景模式">

    <ScrollView
        Orientation="Both"
        >
        <StackLayout HorizontalOptions="CenterAndExpand" VerticalOptions="CenterAndExpand">
            <Label Text="Welcome to Xamarin Forms and Prism!" />
            <Label Text="{Binding AppLifeStatusRecord}"
               FontSize="{OnPlatform 14, iOS=14}">
            </Label>

            <Label
            Text="{Binding Counter}"
            FontSize="30"
            TextColor="Red"/>
            <Button
            Text="開始定時執行"
            Command="{Binding StartCommand}"/>
            <StackLayout
            Orientation="Horizontal"
            >
                <Button Text="Read" Command="{Binding ReadCommand}"/>
                <Button Text="Reset" Command="{Binding ResetCommand}"/>
            </StackLayout>
        </StackLayout>
    </ScrollView>

</ContentPage>
這裡是這個頁面的 ViewModel,定義了三個按鈕的命令行為,在這裡將會透過 AppLifeStatusRecord 類別內的 ReadAsync / WriteAsync 這兩個方法,進行日誌的檔案讀寫需求。
public class MainPageViewModel : INotifyPropertyChanged, INavigationAware
{
    public event PropertyChangedEventHandler PropertyChanged;
    public DelegateCommand StartCommand { get; set; }
    public DelegateCommand ReadCommand { get; set; }
    public DelegateCommand ResetCommand { get; set; }
    public int Counter { get; set; }
    public string AppLifeStatusRecord { get; set; }
    private readonly INavigationService navigationService;

    public MainPageViewModel(INavigationService navigationService)
    {
        this.navigationService = navigationService;
        ReadCommand = new DelegateCommand(async () =>
        {
            AppLifeStatusRecord = await new AppLifeStatusService().ReadAsync();
        });
        ResetCommand = new DelegateCommand(async () =>
        {
            await new AppLifeStatusService().WriteAsync("", true);
            AppLifeStatusRecord = "";
        });
        StartCommand = new DelegateCommand(async () =>
        {
            for (int i = 0; i < 60; i++)
            {
                await Task.Delay(2000);
                Counter++;
                Console.WriteLine($"   === {i} ===");
                await new AppLifeStatusService().WriteAsync($"     Xamarin.Forms= {i} = > Timer - {DateTime.Now.Minute}:{DateTime.Now.Second}");
            }
        });
    }

    public void OnNavigatedFrom(INavigationParameters parameters)
    {
    }

    public void OnNavigatedTo(INavigationParameters parameters)
    {
    }

    public void OnNavigatingTo(INavigationParameters parameters)
    {
    }
}

如何訂用 Xamarin.Forms 的應用程式生命週期的相關事件

請在 Xamarin.Forms 專案中,找到 App.xaml.cs 節點,從這個節點內的 App 類別中,加入底下三個覆寫方法,所以,當應用程式在前景與背景模式下切換的時候,就會觸發這些事件。
protected override async void OnStart()
{
    IsAppInForeground = true;
    new AppLifeStatusService().WriteAsync($"Xamarin.Forms>OnStart - {DateTime.Now.Minute}:{DateTime.Now.Second} - 執行緒 {Thread.CurrentThread.ManagedThreadId}");
}
protected override async void OnSleep()
{
    IsAppInForeground = false;
    new AppLifeStatusService().WriteAsync($"Xamarin.Forms>OnSleep - {DateTime.Now.Minute}:{DateTime.Now.Second} - 執行緒 {Thread.CurrentThread.ManagedThreadId}");
}
protected override async void OnResume()
{
    IsAppInForeground = true;
    new AppLifeStatusService().WriteAsync($"Xamarin.Forms>OnResume - {DateTime.Now.Minute}:{DateTime.Now.Second} - 執行緒 {Thread.CurrentThread.ManagedThreadId}");
}

如何訂用 Xamarin.Android 的應用程式生命週期的相關事件

請在 Xamarin.Android 專案中,找到 MainActivity.cs 節點,從這個節點內的 MainActivity 類別中,加入底下覆寫方法,所以,當一個 Android 平台下的應用程式在前景與背景模式下切換的時候,就會觸發這些事件。
protected override void OnStart()
{
    base.OnStart();
     new AppLifeStatusService().WriteAsync($"     Android>OnStart - {DateTime.Now.Minute}:{DateTime.Now.Second} - 執行緒 {Thread.CurrentThread.ManagedThreadId}");
}
protected override void OnResume()
{
    base.OnResume();
     new AppLifeStatusService().WriteAsync($"     Android>OnResume - {DateTime.Now.Minute}:{DateTime.Now.Second} - 執行緒 {Thread.CurrentThread.ManagedThreadId}"); 
}
protected override void OnPause()
{
    base.OnPause();
     new AppLifeStatusService().WriteAsync($"     Android>OnPause - {DateTime.Now.Minute}:{DateTime.Now.Second} - 執行緒 {Thread.CurrentThread.ManagedThreadId}"); 
}
protected override void OnStop()
{
    base.OnStop();
     new AppLifeStatusService().WriteAsync($"     Android>OnStop - {DateTime.Now.Minute}:{DateTime.Now.Second} - 執行緒 {Thread.CurrentThread.ManagedThreadId}");
}
protected override void OnRestart()
{
    base.OnRestart();
     new AppLifeStatusService().WriteAsync($"     Android>OnRestart - {DateTime.Now.Minute}:{DateTime.Now.Second} - 執行緒 {Thread.CurrentThread.ManagedThreadId}");
}
protected override void OnDestroy()
{
    base.OnDestroy();
     new AppLifeStatusService().WriteAsync($"     Android>OnDestroy - {DateTime.Now.Minute}:{DateTime.Now.Second} - 執行緒 {Thread.CurrentThread.ManagedThreadId}");
}

如何訂用 Xamarin.iOS 的應用程式生命週期的相關事件

請在 Xamarin.iOS 專案中,找到 AppDelegate.cs 節點,從這個節點內的 AppDelegate 類別中,加入底下覆寫方法,所以,當一個 iOS 平台下的應用程式在前景與背景模式下切換的時候,就會觸發這些事件。
public override void OnActivated(UIApplication application)
{
    base.OnActivated(application);
    new AppLifeStatusService().WriteAsync($"     iOS>OnActivated - {DateTime.Now.Minute}:{DateTime.Now.Second} - 執行緒 {Thread.CurrentThread.ManagedThreadId}");
}
public override void WillEnterForeground(UIApplication application)
{
    base.WillEnterForeground(application);
    new AppLifeStatusService().WriteAsync($"     iOS>WillEnterForeground - {DateTime.Now.Minute}:{DateTime.Now.Second} - 執行緒 {Thread.CurrentThread.ManagedThreadId}");
}
public override void OnResignActivation(UIApplication application)
{
    base.OnResignActivation(application);
    new AppLifeStatusService().WriteAsync($"     iOS>OnResignActivation - {DateTime.Now.Minute}:{DateTime.Now.Second} - 執行緒 {Thread.CurrentThread.ManagedThreadId}");
}
public override void DidEnterBackground(UIApplication application)
{
    base.DidEnterBackground(application);
    new AppLifeStatusService().WriteAsync($"     iOS>DidEnterBackground - {DateTime.Now.Minute}:{DateTime.Now.Second} - 執行緒 {Thread.CurrentThread.ManagedThreadId}");
}
// not guaranteed that this will run
public override void WillTerminate(UIApplication application)
{
    base.WillTerminate(application);
    new AppLifeStatusService().WriteAsync($"     iOS>WillTerminate - {DateTime.Now.Minute}:{DateTime.Now.Second} - 執行緒 {Thread.CurrentThread.ManagedThreadId}");
}

開始進行 Android 平台測試

當把這個測試範例專案在 Android 環境下啟動執行之後,可以從 Visual Studio 2019 的輸出視窗中看到底下的輸出日誌,這部分可以對照上面所提到的 應用程式生命週期 說明內容。
   --> Xamarin.Forms>OnStart - 46:53 - 執行緒 1
   -->      Android>OnStart - 46:53 - 執行緒 1
   -->      Android>OnResume - 46:53 - 執行緒 1
下面螢幕截圖將會是這個應用程式的執行結果
現在要點選螢幕上的 [開始定時執行] 這個按鈕,當紅色數字跑到 3 的時候,請點選到 Home 按鍵,這個時候應用程式將會被推到不可見的背景模式,請等候一分鐘左右的時間,將這個 App 切換到可見的前景模式。當應用程式回到可見前景模式,此時看到紅色數字已經變成 40 了。
 
當這個應用程式切換到背景不可見模式下的時候,可以從 Visual Studio 2019 的輸出視窗內,看到還是有不斷的輸出日誌顯示出來,這就表示了,雖然這個 Android 應用程式切換到不可見的背景模式下,可是,他還是會繼續的執行。
   === 0 ===
   -->      Xamarin.Forms= 0 = > Timer - 43:52
   === 1 ===
   -->      Xamarin.Forms= 1 = > Timer - 43:54
   === 2 ===
   -->      Xamarin.Forms= 2 = > Timer - 43:56
   -->      Android>OnPause - 43:57 - 執行緒 1
   --> Xamarin.Forms>OnSleep - 43:57 - 執行緒 1
   -->      Android>OnStop - 43:58 - 執行緒 1
   === 3 ===
   -->      Xamarin.Forms= 3 = > Timer - 43:58
   === 4 ===
   -->      Xamarin.Forms= 4 = > Timer - 44:00
   === 5 ===
   -->      Xamarin.Forms= 5 = > Timer - 44:20
   === 6 ===
   -->      Xamarin.Forms= 6 = > Timer - 44:40
   === 7 ===
   -->      Xamarin.Forms= 7 = > Timer - 44:60
   === 8 ===
   -->      Xamarin.Forms= 8 = > Timer - 44:80
   === 9 ===
   -->      Xamarin.Forms= 9 = > Timer - 44:10
   === 10 ===
   -->      Xamarin.Forms= 10 = > Timer - 44:12

...

   === 33 ===
   -->      Xamarin.Forms= 33 = > Timer - 44:58
   === 34 ===
   -->      Xamarin.Forms= 34 = > Timer - 45:0
   --> Xamarin.Forms>OnResume - 45:2 - 執行緒 1
   -->      Android>OnRestart - 45:2 - 執行緒 1
   === 35 ===
   -->      Xamarin.Forms= 35 = > Timer - 45:2
   === 36 ===
   -->      Xamarin.Forms= 36 = > Timer - 45:5
   === 37 ===
   -->      Xamarin.Forms= 37 = > Timer - 45:7
   === 38 ===
   -->      Xamarin.Forms= 38 = > Timer - 45:9

開始進行 iOS 平台測試

當把這個測試範例專案在 iOS 環境下啟動執行之後,可以從 Visual Studio 2019 的輸出視窗中看到底下的輸出日誌,這部分可以對照上面所提到的 應用程式生命週期 說明內容。
    --> Xamarin.Forms>OnStart - 45:55 - 執行緒 1
    -->      iOS>OnActivated - 45:55 - 執行緒 1
下面螢幕截圖將會是這個應用程式的執行結果
現在要點選螢幕上的 [開始定時執行] 這個按鈕,當紅色數字跑到 3 的時候,請點選到 Home 按鍵,這個時候應用程式將會被推到不可見的背景模式。現在,App 已經在不可見的背景模式下,請觀察 Visual Stuio 2019 的輸出視窗,應該不像是 Android 應用程式,此時輸出視窗內是沒有任何執行日誌輸出到輸出視窗內。
    === 0 ===
    -->      Xamarin.Forms= 0 = > Timer - 49:35
    === 1 ===
    -->      Xamarin.Forms= 1 = > Timer - 49:37
    === 2 ===
    -->      Xamarin.Forms= 2 = > Timer - 49:39
    --> Xamarin.Forms>OnSleep - 49:40 - 執行緒 1
    -->      iOS>OnResignActivation - 49:40 - 執行緒 1
    -->      iOS>DidEnterBackground - 49:41 - 執行緒 1
    === 3 ===
    -->      Xamarin.Forms= 3 = > Timer - 49:41
請等候一分鐘左右的時間,將這個 App 切換到可見的前景模式,當應用程式回到可見前景模式,此時看到紅色數字已經變成 6 了,這裡的紅色數字也與 Android 平台下運作不相同。
 
底下是在 iOS 平台下,當 App 從不可見背景模式切換到可見的模式下,在 Visual Studio 2019 輸出視窗內再度寫入的內容。因此,可以知道,對 iOS App,當應用程式切換到不可見的背景模式下,這個 App 的任何執行緒是沒有且無法做任何事情的。
+

    -->      iOS>WillEnterForeground - 54:31 - 執行緒 1
    === 4 ===
    -->      Xamarin.Forms= 4 = > Timer - 54:31
    --> Xamarin.Forms>OnResume - 54:31 - 執行緒 1
    -->      iOS>OnActivated - 54:31 - 執行緒 1
    === 5 ===
    -->      Xamarin.Forms= 5 = > Timer - 54:33
    === 6 ===
    -->      Xamarin.Forms= 6 = > Timer - 54:35
    === 7 ===
    -->      Xamarin.Forms= 7 = > Timer - 54:37
    === 8 ===
    -->      Xamarin.Forms= 8 = > Timer - 54:39
    === 9 ===
    -->      Xamarin.Forms= 9 = > Timer - 54:41


了解更多關於 [Xamarin.Android] 的使用方式
了解更多關於 [Xamarin.iOS] 的使用方式
了解更多關於 [Xamarin.Forms] 的使用方式
了解更多關於 [Hello, Android:快速入門] 的使用方式
了解更多關於 [Hello, iOS – 快速入門] 的使用方式
了解更多關於 [Xamarin.Forms 快速入門] 的使用方式


2019/05/29

Xamarin.iOS 的遠端推播通知 Remote Push Notification - 使用 Azure Notification Hub

Xamarin.iOS 的遠端推播通知 Remote Push Notification - 使用 Azure Notification Hub

本章節將會說明如何透過 Azure Notification Hub 服務,建立起一個具有遠端推播訊息功能的 Android App。
本教學課程示範如何使用 Azure 通知中樞將推播通知傳送至 iOS 應用程式。 您會使用 Apple Push Notification Service (APNS) 建立可接收推播通知的空白 Xamarin.iOS 應用程式。完成之後,您將可使用通知中樞,將推播通知廣播到所有執行您的應用程式的裝置。
在本教學課程中,您會建立/更新程式碼以執行下列工作:
  • 產生憑證簽署要求檔案
  • 針對推播通知註冊應用程式
  • 建立應用程式的佈建設定檔
  • 針對 iOS 推播通知設定您的通知中樞
  • 傳送測試推播通知

必要條件

  • Azure 訂用帳戶。 如果您沒有 Azure 訂用帳戶,請在開始前建立免費 Azure 帳戶。
  • 最新版的 Xcode
  • iOS 10 (或更新版本) 相容的裝置
  • Apple Developer Program 成員資格。
  • Visual Studio for Mac

建立 iOS 佈建設定檔

Apple Push Notification Service (APNS) 使用憑證來驗證您的通知服務。 遵循下列指示來建立必要的推播憑證,以便傳送和接收通知。 如需這些概念的詳細資訊,請參閱 Apple Push Notification Service 官方文件。
產生憑證簽署要求 (CSR) 檔案,這將由 Apple 用來產生簽署的推播憑證。

建立 憑證簽署要求 (CSR) 檔案

  • 開啟 [啟動台] 上的 [其他] 資料夾
  • 打開 [鑰匙圈存取],並展開 [憑證輔助程式],然後按一下 [從憑證授權要求憑證...]。使用金鑰鏈存取要求新憑證
    鑰匙圈存取 > 憑證輔助程式 > 從憑證授權要求憑證
當 [憑證輔助程式] 視窗顯示出來後,請在 [使用者電子郵件地址] 與 [一般名稱] 填入適當的欄位值,接著勾選 [儲存至磁碟],然後點選 [繼續] 按鈕。
憑證輔助程式 視窗
設定合適的 憑證簽署要求 (CSR) 檔案名稱,接著選取要將這個檔案儲存到的目錄位置,在這裡預設為儲存到 [桌面] 資料夾,確認無誤之後,點選 [儲存] 按鈕,將這個檔案儲存取來。
儲存 憑證簽署要求
妥善保存 憑證簽署要求 (CSR) 檔案
該 憑證簽署要求 (CSR) 檔案 檔案相當的重要,請務必要妥善保存在一個安全的地方
  • 此時,憑證輔助程式 已經將 憑證簽署要求 檔案儲存到指定的目錄下,請點選 [完成] 按鈕,結束此作業。
    完成建立 憑證簽署要求 檔案

建立 開發環境用的憑證 (Certificates > Development)

  • 開啟 Apple Developer 網頁
  • 點選右上方的 [Account] 連結
  • 輸入 Apple Developer 帳號與密碼,以登入此系統
    Apple Developer
  • 在左方功能清單中,點選 [Certificates, IDs & Profiles] 選項
  • 現在將會位於 [Certificates] > [All] 的 [iOS Certificates] 頁面,請點選右上方的 [Add] 新增按鈕
    iOS Certificates
  • 選擇 iOS App Development 項目
    iOS App Development
  • 接著點選最下方的 Continue 按鈕
    iOS App Development
  • 現在這個頁面說明什麼是一個 憑證簽署要求 (Certificate Signing Request CSR),並且要如何建立這個檔案,不過,這個 憑證簽署要求 (CSR) 檔案已經於上面程序中產生出來,因此,可以捲動到該頁面最下方,點選 [Continue] 按鈕。
    About Creating a Certificate Signing Request (CSR)
  • 此時,需要在這個頁面把 憑證簽署要求 (CSR) 檔案,上傳到 Apple Developer 系統內
    Generate your certificate
  • 點選 [Choose File...] 按鈕
  • 在顯示出來的選擇檔案對話窗中,切換到 憑證簽署要求 (CSR) 檔案所在的目錄下,選擇這個 憑證簽署要求 (CSR) 檔案
  • 點選 [選擇] 按鈕
  • 捲動到該頁面最下方,點選 [Continue] 按鈕
    Generate your certificate
  • 頁面顯示出 [Your certificate is ready.] 標題,現在可以點選 [Download] 按鈕,下載這個開發憑證到 Mac 電腦上。
    Your certificate is ready
  • 如同該頁面文字上的描述,剛剛下載下來的檔案,請開啟這個憑證檔案 (檔案名稱為: ios_development.cer),安裝到 Mac 電腦上的 鑰匙圈存取 內。
  • 從 [Certificates, IDs & Profiles] 頁面,點選左方的 [Certificates] > [All] 連結,將會看到剛剛建立好的開發環境用的憑證。
    建立好的開發環境用的憑證

建立 新的應用程式識別碼 (App ID)

  • 從 [Certificates, IDs & Profiles] 頁面,點選左方的 [Identifiers] > [App IDs] 連結。
    Identifiers > App IDs
  • 請點選右上方的 [Add] 新增按鈕
  • 在 [Registering an App ID] 頁面,也就是要註冊應用程式識別碼,找到 [App ID Description] 的 [Name] 欄位,在這個欄位內填入這個應用程式的名稱說明內容。
  • 在 [App ID Suffix] 區段下, 找到 [Explicit App ID] 這個選項,並且勾選這個選項,找到該選項底下的 [Bundle ID] ,也就是 [明確的應用程式識別碼] 欄位,在這個欄位中輸入該應用程式的明確識別碼,在此,請輸入 com.vulcan.azurenhub 文字字串。
    Registering an App ID 頁面
  • 在 [App Services] 區段下, 找到 [Push Notifications] 這個選項,請勾選這個選項
    App Services
  • 點選 [Continue] 這個按鈕
  • 當出現 [Confirm your App ID] 頁面主題,點選最下方的 [Register] 按鈕
    Confirm your App ID
  • 當看見 [Registration complete] 畫面,如下圖所示。 按一下 [Done] 按鈕
    Registration complete

取得 Azure 通知中樞要用到的 .p12 憑證的檔案

  • 從 [Certificates, IDs & Profiles] 頁面,點選左方的 [Identifiers] > [App IDs] 連結,找到剛剛產生的 應用程式識別碼 App ID,點選這個 com.vulcan.azurenhub 應用程式識別碼
    App IDs 清單
  • 捲動到下方,找到底部的 [Edit] 按鈕,點選這個 [Edit] 按鈕
  • 現在將會切換到 [iOS App ID Settings] 頁面
    iOS App ID Settings
  • 捲到到該頁面最下方,將會看到 [Push Notifications] 這個項目,請找到 [Development Push SSL Certificate] 區段,點選該區段下方的 [Create Certificate...] 按鈕
    Push Notifications > Development Push SSL Certificate
  • 現在這個頁面,[About Creating a Certificate Signing Request (CSR)],將會再度說明什麼是一個 憑證簽署要求 (Certificate Signing Request CSR),以及說明要如何建立這個檔案,不過,這個 憑證簽署要求 (CSR) 檔案已經於上面程序中產生出來,因此,可以捲動到該頁面最下方,點選 [Continue] 按鈕。
    About Creating a Certificate Signing Request (CSR)
  • 在 [Generate your certificate] 頁面,點選 [Choose File...] 按鈕,將會顯示選擇檔案對話窗中,切換到 憑證簽署要求 (CSR) 檔案所在的目錄下,選擇這個 憑證簽署要求 (CSR) 檔案
  • 點選 [選擇] 按鈕
  • 捲動到該頁面最下方,點選 [Continue] 按鈕
    Generate your certificate
  • 現在頁面為 [Your certificate is ready] ,請點選 [Download] 按鈕,下載這個憑證到 Mac 電腦上,並且點選 [Done] 按鈕
    Your certificate is ready
  • 如同該頁面文字上的描述,剛剛下載下來的檔案,請開啟這個憑證檔案 (檔案名稱為: aps_development.cer),安裝到 Mac 電腦上的 鑰匙圈存取 內。
  • 開啟 Mac 電腦上的 鑰匙圈存取,點選左下方的 [憑證] 功能選項,從右方清單中,找到剛剛匯入的推播憑證。
    建立好的推播用的憑證
  • 以滑鼠右擊這個推播憑證, 按一下 [輸出 「Apple Development iOS Push Service: com.vulcan.azurenhub」...] 選項
  • 在儲存為欄位中,輸入 azurenhub APNS Push Service 為檔案命名、選取 [個人資訊交換 .p12] 格式,然後按一下 [儲存] 按鈕。
    匯出 個人資訊交換 .p12
  • 請輸入未來要使用這個 個人資訊交換 .p12 檔案時候,需要驗證的密碼,完成後,請點選 [好] 按鈕。
    個人資訊交換 .p12 驗證的密碼
  • 現在將會需要輸入 鑰匙圈存取的密鑰,以便匯出動作,請輸入密碼之後,點選 [允許] 按鈕,完成匯出動作。
    鑰匙圈存取的密鑰

建立 應用程式的佈建設定檔

  • 從 [Certificates, IDs & Profiles] 頁面,點選左方的 [Provisioning] > [All] 連結,
    Provisioning > All
  • 請點選右上方的 [Add] 新增按鈕
  • 在 [What type of provisioning profile do you need]頁面,選取 [Development] 區段下的 [iOS App Development] 選項,然後點選 [Continue] 按鈕。
    Registering an App ID 頁面
  • 在 [Select App ID]頁面,從該頁面中間的 [App ID] 下拉選單欄位中,剛剛建立的 App ID,接著點選 [Continue] 按鈕。
    Select App ID
  • 在 [Select certificates]頁面,選取用於程式碼簽署會用到的開發憑證,然後按一下 [Continue] 按鈕。
    Select certificates
  • 在 [Select devices]頁面,選取要用來測試的 [裝置],請選取合適的 Device ID ,然後按一下 [Continue] 按鈕。
    Select devices
  • 在 [Name this profile generate]頁面,請在 [Profile Name] 欄位,輸入這個 設定檔 Profile 名稱,採此,將會輸入 Azure Notification Hub Demo Profile ,然後按一下 [Continue] 按鈕。
    Name this profile generate
  • 在 [Your provisioning profile is ready]頁面,點選 [Download] 按鈕,下載這個設定檔案 (此時,該檔案名稱將會為 Azure_Notification_Hub_Demo_Profile.mobileprovision )
    Your provisioning profile is ready
  • 當下載完成後,開啟這個設定檔案並安裝在 Xcode 開發電腦上。 然後按一下 [完成] 按鈕。

設定 Azure 通知中樞的 iOS 推播通知設定

由於在前一章節,已經有說明如何建立一個 Azure 通知中樞,並且透過通知中樞可以將訊息推送到 Android 裝置內,因此,在這裡,將會繼續使用之前建立好的 Azure 通知中樞,繼續完成 iOS 推播通知的設定。
  • 打開 Azure 入口網站 網頁,使用您的 Microsoft 帳號,登入到 Azure 系統內 。
    Azure 入口網站
  • 在 Azure 入口網站 左方,點選 [所有資源],當 所有資源群組都出現之後,點選 [azure-notification-hub-lab] 這個資源群組項目
    Azure 入口網站 > 所有資源
  • 在 [azure-notification-hub-lab] 資源群組清單顯示出來之後,找到 類型為 [Notification Hub] 的項目 azure-notification-hub-lab (azure-notification-hub-lab/azure-notification-hub-lab) ,使用滑鼠點擊這個連結。
    azure-notification-hub-lab 資源群組
設定通知中樞的 iOS 設定
  • 在左方的 [設定] 區段內,點選 [Apple (APNS)]。
  • 在 [Authentication Mode]下,選擇 [Certificate]
  • 在 [Upload Certificate] 欄位下,選擇剛剛下載下來的 個人資訊交換 .p12 檔案,也就是 [azurenhub APNS Push Service.p12]。
  • 在 [Password] 欄位中,輸入匯出 個人資訊交換 .p12 檔案時候所設定的密碼
  • 在 [Application Mode] 欄位,點選 [Sandbox] 選項。只有在您想傳送推播通知給從市集購買應用程式的使用者時,才可使用 [生產] 模式。
  • 最後,點選 [Save] 按鈕
    上傳 個人資訊交換 .p12 檔案

設定 Xamarin.iOS 應用程式,並將其連線至通知中樞

在此,將會繼續延續上一章節中建立的 [XFAzureNHub] Xamarin.Forms 專案,請使用 Visual Studio 2017 打開此專案

設定 Xamarin.iOS 專案

  • 展開 [XFAzureNHub.iOS] 專案,使用滑鼠雙擊 [Info.plist] 節點
  • 在 [應用程式] 標籤頁次,找到 [套件組合識別碼] 欄位,把剛剛設定的 [Bundle ID] 值,也就是 com.vulcan.azurenhub 輸入到這個欄位中。
    XFAzureNHub.iOS > Info.plist
  • 展開 [XFAzureNHub.iOS] 專案,使用滑鼠雙擊 [Entitlements.plist] 節點
  • 切換到 [推播通知] 標籤頁次,勾選 [啟用推播通知] 欄位。
    XFAzureNHub.iOS > Entitlements.plist

安裝相關 NuGet 套件

  • 滑鼠右擊 [XFAzureNHub.iOS] 專案的 [參考] 節點,選取 [管理 NuGet 套件] 選項
  • 切換到 [瀏覽] 標籤頁次
  • 搜尋 [Xamarin.Azure.NotificationHubs.iOS] 套件,安裝到 [XFAzureNHub.iOS] 專案
    安裝 Xamarin.Azure.NotificationHubs.iOS 套件

建立 Constants.cs 類別

  • 在 [XFAzureNHub.iOS] 專案內,建立一個 Constants.cs 類別,並定義類別中的下列常數值。
    其中,[ListenConnectionString] 這個常數,需要到 Azure 通知中樞中,找到 [DefaultListenSharedAccessSignature] 這個欄位值來填入進來,這個欄位值可以從 [azure-notification-hub-lab] 這個通知中樞設定頁面,在左方功能清單的最下方,找到 [Manage] > [Access Policies] 連結,點擊之後,就會在右方視窗中看到 [DefaultListenSharedAccessSignature] 欄位。
    在 Azure Notification Hub 的 DefaultListenSharedAccessSignature 值
    另外一個 [NotificationHubName] 常數,就是這個 Azure 通知中樞的名稱,也就是 [azure-notification-hub-lab]
    在 Azure Notification Hub 的該中樞的名稱
 Constants.cs
public static class Constants
{
    public const string ListenConnectionString = "請在這裡填入 Azure Notification Hub 的 DefaultListenSharedAccessSignature 值";
    public const string NotificationHubName = "這裡填入 Azure Notificaion Hub 的名稱";
    public const string NotificationTitle = "Azure 通知中樞訊息";
}

修正 AppDelegate 類別

  • 打開 [AppDelegate.cs] 檔案,在最前面加入底下的命名空間參考
 AppDelegate.cs
using WindowsAzure.Messaging;
using UserNotifications;
在 [AppDelegate] 類別中,宣告 SBNotificationHub 的執行個體
 AppDelegate.cs
private SBNotificationHub Hub { get; set; }
在 [AppDelegate] 類別中,更新 FinishedLaunching() 以符合下列程式碼
 AppDelegate.cs
public override bool FinishedLaunching(UIApplication app, SDictionary options)
{
    if (UIDevice.CurrentDevice.CheckSystemVersion(10, 0))
    {
        UNUserNotificationCenter.Current.RequestAuthorization
            (UNAuthorizationOptions.Alert | UNAuthorizationOptions.Sound | UNAuthorizationOptions.Sound,
            (granted, error) =>
            {
                if (granted)
                    InvokeOnMainThread(UIApplication.SharedApplication.RegisterForRemoteNotifications);
            });
    }
    else if (UIDevice.CurrentDevice.CheckSystemVersion(8, 0))
    {
        var pushSettings = UIUserNotificationSettings.GetSettingsForTypes(
                UIUserNotificationType.Alert | UIUserNotificationType.Badge | UIUserNotificationType.Sound,
                new NSSet());
        UIApplication.SharedApplication.RegisterUserNotificationSettings(pushSettings);
        UIApplication.SharedApplication.RegisterForRemoteNotifications();
    }
    else
    {
        UIRemoteNotificationType notificationTypes = UIRemoteNotificationType.Alert | UIRemoteNotificationType.Badge | UIRemoteNotificationType.Sound;
        UIApplication.SharedApplication.RegisterForRemoteNotificationTypes(notificationTypes);
    }
    global::Xamarin.Forms.Forms.Init();
    LoadApplication(new App(new iOSInitializer()));
    return base.FinishedLaunching(app, options);
}
  • 在 AppDelegate.cs 中覆寫 RegisteredForRemoteNotifications() 方法
 AppDelegate.cs
public override void RegisteredForRemoteNotifications(UIApplication application, NSData deviceToken)
{
    Hub = new SBNotificationHub(Constants.ListenConnectionString, Constants.NotificationHubName);
    Hub.UnregisterAllAsync(deviceToken, (error) => {
        if (error != null)
        {
            System.Diagnostics.Debug.WriteLine("Error calling Unregister: {0}", error.ToString());
            return;
        }
        NSSet tags = null; // create tags if you want
        Hub.RegisterNativeAsync(deviceToken, tags, (errorCallback) => {
            if (errorCallback != null)
                System.Diagnostics.Debug.WriteLine("RegisterNativeAsync error: " + errorCallback.ToString());
        });
    });
}
  • 在 AppDelegate.cs 中覆寫 ReceivedRemoteNotification() 方法
 AppDelegate.cs
public override void ReceivedRemoteNotification(UIApplication application, NSDictionary userInfo)
{
    ProcessNotification(userInfo, false);
}
  • 在 AppDelegate.cs 中建立 ProcessNotification() 方法
 AppDelegate.cs
void ProcessNotification(NSDictionary options, bool fromFinishedLaunching)
{
    // Check to see if the dictionary has the aps key.  This is the notification payload you would have sent
    if (null != options && options.ContainsKey(new NSString("aps")))
    {
        //Get the aps dictionary
        NSDictionary aps = options.ObjectForKey(new NSString("aps")) as NSDictionary;
        string alert = string.Empty;
        //Extract the alert text
        // NOTE: If you're using the simple alert by just specifying
        // "  aps:{alert:"alert msg here"}  ", this will work fine.
        // But if you're using a complex alert with Localization keys, etc.,
        // your "alert" object from the aps dictionary will be another NSDictionary.
        // Basically the JSON gets dumped right into a NSDictionary,
        // so keep that in mind.
        if (aps.ContainsKey(new NSString("alert")))
            alert = (aps[new NSString("alert")] as NSString).ToString();
        //If this came from the ReceivedRemoteNotification while the app was running,
        // we of course need to manually process things like the sound, badge, and alert.
        if (!fromFinishedLaunching)
        {
            //Manually show an alert
            if (!string.IsNullOrEmpty(alert))
            {
                UIAlertView avAlert = new UIAlertView("Notification", alert, null, "OK", null);
                avAlert.Show();
            }
        }
    }
}

開始進行測試

  • 滑鼠右擊專案 [XFAzureNHub.iOS],點選 [設定為起始專案] 選項
  • 選擇在 iPhone 裝置上來執行這個 [XFAzureNHub.iOS] 專案
    codesign 授權
codesign 授權
在建置或者執行的時候,將會使用開發者憑證進行程式碼簽名,此時,在 Mac 電腦上將會出現上述對話窗,請輸入登入的密碼並且允許程式碼簽名。
  • 當這個 App 在 iPhone 上第一次啟動之後,將會看到如下圖畫面,請點選 [允許] 按鈕
    想要傳送通知
  • 在 Azure 通知中樞 (azure-notification-hub-lab) 的網頁上,點選 [Test Send] 按鈕
    Azure 通知中樞 (azure-notification-hub-lab)
  • 切換 [Platform] 欄位值為 [Apple]
  • 點選下方的 [Send] 按鈕
    準備進行 Android 平台的通知測試
  • 當最下方的 [Result] 列表出現新的紀錄,則表示剛剛的通知推播已經傳送到遠端裝置上了
    推播通知傳送結果
    若這個應用程式不在前景執行中,也是可以收到來自遠端的通知推播的
    推播通知傳送結果