XAML in Xamarin.Forms 基礎篇 電子書

XAML in Xamarin.Forms 基礎篇 電子書

Xamarin.Forms 快速入門 電子書

Xamarin.Forms 快速入門 電子書

2016/10/20

Xamarin.Forms 導航抽屜頁面的資料綁定與抽屜面板控制

在這份筆記中,將會記錄下底下三件事情是如何做到的
  • 如何透過 Data Binding 在 ViewModel 內來設定導航頁面中的頁面名稱
  • 如何得知抽屜的設計尺寸與內容頁面的設計尺寸
  • 最後,如何在詳細頁面的 ViewModel 內,關閉與顯示導航抽屜面
參考專案
https://github.com/vulcanlee/XF-Course/tree/master/DrawerPresent

透過 Data Binding 在 ViewModel 內來設定導航頁面中的頁面名稱

先在 ViewModel 定義一個字串型別的屬性(Property)
在 Detail 頁面的 ContentPage 根結點的屬性 Title,使用 Data Binding 綁定 ViewModel 內的屬性。Title="{Binding PageTitle}"
之後,只要在 ViewModel 內去變更綁定的屬性值,頁面上的顯示名稱就會跟著變更了。
<ContentPage xmlns="http://xamarin.com/schemas/2014/forms"
             xmlns:x="http://schemas.microsoft.com/winfx/2009/xaml"
             xmlns:prism="clr-namespace:Prism.Mvvm;assembly=Prism.Forms"
             prism:ViewModelLocator.AutowireViewModel="True"
             x:Class="PrismUnityApp1.Views.MainPage"
             x:Name="contentPage"
             Title="{Binding PageTitle}">

得知抽屜的設計尺寸與內容頁面的設計尺寸

在 Master 與 Detail 的 ContentPage 頁面中,使用底下 XAML 宣告標記,其中, currentPage 將會指向當時所在的 ContentPage
底下為模擬器的執行結果
Android
iOS

UWP for Mobile

    <StackLayout 
        Orientation="Vertical" Spacing="0" 
        HorizontalOptions="Center" VerticalOptions="Center">
        <Label Text="{Binding Title}" />
        <Label Text="{Binding Source={x:Reference currentPage}, Path=Width, StringFormat='Page: {0:F0}'}" FontSize="Large" />
        <Label Text="{Binding Source={x:Reference currentPage}, Path=Height, StringFormat=' &#x00D7; {0:F0}'}" FontSize="Large" />

        <Button Text="顯示抽屜" Command="{Binding 顯示抽屜Command}" />
    </StackLayout>

在詳細頁面的 ViewModel 內,關閉與顯示導航抽屜面

想要在 Detail 頁面內來控制 Master 的導航抽屜是要開啟還是要關閉,這個時候,就需要透過 Prism 提供的 IEventAggregator 介面,使用建構式注入的方式,取得實際的事件處理物件,就可以透過這個物件,在不同頁面進行非同步的訊息通訊。也就是,在 Detail 頁面的 ViewModel,將會 Publish 方法,送出一個事件訊息,而在 Master 頁面的 ViewModel ViewModel 內,就可以使用 Subscribe 方法來訂閱這個事件,一旦收到了要關閉或者展開抽屜面版的時候,就可以變更 ViewModel 內的特定 Property,而 該 Property 會綁定到 MasterDetailPage 的 IsPresented 屬性。
綁定方式如下:
<MasterDetailPage xmlns="http://xamarin.com/schemas/2014/forms"
                  xmlns:x="http://schemas.microsoft.com/winfx/2009/xaml"
                  xmlns:prism="clr-namespace:Prism.Mvvm;assembly=Prism.Forms"
                  prism:ViewModelLocator.AutowireViewModel="True"
                  x:Name="masterPage"
                  x:Class="PrismUnityApp1.Views.MDPage"
                  IsPresented="{Binding IsPresented, Mode=TwoWay}"
                  >
在 Detail 頁面,可以發出要顯示抽屜的訊息
       private readonly IEventAggregator _eventAggregator;
       public MainPageViewModel(IEventAggregator eventAggregator)
        {

            _eventAggregator = eventAggregator;
            顯示抽屜Command = new DelegateCommand(()=>
            {
                _eventAggregator.GetEvent<OpenDrawer>().Publish(true);
            });
        }
在 Master 頁面,可以訂閱這個事件,並且更新相關屬性
        private readonly IEventAggregator _eventAggregator;
        public MDPageViewModel(IEventAggregator eventAggregator)
        {

            _eventAggregator = eventAggregator;

            _eventAggregator.GetEvent<OpenDrawer>().Subscribe(
                (s) =>
                {
                    IsPresented = s;
                });
        }

2016/10/19

Xamarin.Forms 導航頁面的工具列按鈕與按鈕圖片

若現在設計的 ContentPage 頁面是具有可導航的特性,此時,可以使用 ContentPage.ToolbarItems 這個 Property Element 來定義這個頁面可以使用那些工具列按鈕。
參考專案
https://github.com/vulcanlee/XF-Course/tree/master/TBIVideoLabImg

了解更多關於 [Xamarin.Android] 的使用方式
了解更多關於 [Xamarin.iOS] 的使用方式
了解更多關於 [Xamarin.Forms] 的使用方式
了解更多關於 [Hello, Android:快速入門] 的使用方式
了解更多關於 [Hello, iOS – 快速入門] 的使用方式
了解更多關於 [Xamarin.Forms 快速入門] 的使用方式

在底下定義中,定義了三個工具列按鈕,前兩個設定為會顯示在主要工具列上,後者則則會顯示在次要工具列上;在三個不同平台上的執行效過如底下截圖。
    <ContentPage.ToolbarItems>
        <ToolbarItem Text="OK" Clicked="ToolbarItem_Clicked"/>
        <ToolbarItem Text="取消" Command="{Binding 取消Command}"/>
        <ToolbarItem Text="Other" Command="{Binding OtherCommand}" Order="Secondary" />
    </ContentPage.ToolbarItems>
Android

iOS

UWP

從上面的三個平台跑出來的結果,發現到 UWP 平台的工具列按鈕預設不會出現,這個時候,請使用 ToolbarItem 的 Icon 屬性,設定每個 ToolbarItem 要顯示的圖示圖片。
在下面的 XAML 宣告,使用了 <OnPlatform x:TypeArguments="FileImageSource" ,分別定義了三個平台需要使用 FileImageSource 要用到的 Icon 名稱。
    <ContentPage.ToolbarItems>
        <ToolbarItem Text="OK" Clicked="ToolbarItem_Clicked">
            <ToolbarItem.Icon>
                <OnPlatform x:TypeArguments="FileImageSource"
                           iOS="OK.png" Android="OK.png" WinPhone="Assets/OK.png" />
            </ToolbarItem.Icon>
        </ToolbarItem>
        <ToolbarItem Text="取消" Command="{Binding 取消Command}">
            <ToolbarItem.Icon>
                <OnPlatform x:TypeArguments="FileImageSource"
                           iOS="Cancel.png" Android="Cancel.png" WinPhone="Assets/Cancel.png" />
            </ToolbarItem.Icon>
        </ToolbarItem>
        <ToolbarItem Text="Other" Command="{Binding OtherCommand}" Order="Secondary" >
            <ToolbarItem.Icon>
                <OnPlatform x:TypeArguments="FileImageSource"
                           iOS="Other.png" Android="Other.png" WinPhone="Assets/Other.png" />
            </ToolbarItem.Icon>
        </ToolbarItem>
    </ContentPage.ToolbarItems>
底下是工具列按鈕有設定圖片之後的執行截圖
Android

iOS

UWP

2016/10/17

Xamarin.Forms 在 ListView 內使用 x:Array 定義要選取的清單項目

當在 XAML 下使用這個 ListView 控制項,若該 ListView 裡面要顯示的項目清單內容是固定的,您可以不需要使用到 ItemsSource 這個屬性來設定 ListView 的明細項目,當然,在 ViewModel 內也就不需要定義 ObservableCollection 這個物件屬性;這個時候,您可以透過 ListView.ItemsSource 直接設定這些項目內容,如底下宣告方式。
範例專案可以參考
        <ListView>
            <ListView.ItemsSource>
                <x:Array Type="{x:Type Color}">
                    <Color>Red</Color>
                    <Color>Green</Color>
                    <Color>Blue</Color>
                    <Color>Aqua</Color>
                    <Color>Purple</Color>
                    <Color>Yellow</Color>
                </x:Array>
            </ListView.ItemsSource>
            <ListView.ItemTemplate>
                <DataTemplate>
                    <ViewCell>
                        <BoxView Color="{Binding}" />
                    </ViewCell>
                </DataTemplate>
            </ListView.ItemTemplate>
        </ListView>

2016/10/16

Xamarin.Forms 客製化 Picker 控制項,使其具備可資料綁定能力

繼承原有控制項進行客製化,擴充原有控制項的功能與能力,是個相當重的議題,不過,這也屬於進階性的學習。

了解更多關於 [Xamarin.Android] 的使用方式
了解更多關於 [Xamarin.iOS] 的使用方式
了解更多關於 [Xamarin.Forms] 的使用方式
了解更多關於 [Hello, Android:快速入門] 的使用方式
了解更多關於 [Hello, iOS – 快速入門] 的使用方式
了解更多關於 [Xamarin.Forms 快速入門] 的使用方式

當然,想要擴充原有的控制項可以有其他的選擇,例如,使用附加可綁定屬性、行為等等,在這份筆記中,將會描述如何擴充 Picker 這個控制項,使其具有可綁定的資料來源屬性、選取後的可綁定資料屬性;另外,也可以設定當有選取新的資料項目之後,可以執行所綁定的 Command 命令,這個命令當然也是支援可綁定屬性能力。這樣的話,所擴充出來的 Picker 控制項,就可以直些在 XAML 內進行宣告,與將相關商業處理邏輯寫在 ViewModel 內,也就是說,您不再需要透過 Code Behind 來做這些事情。
這份筆記的專案原始碼如下  

客製 Picker 控制項

首先,產生一個類別,使其繼承 Picker,其他的設定如底下程式碼,接下來說明這個新的類別做了甚麼事情。
  • 在 BindablePicker 類別內,產生了三個可綁定屬性,分別為 ItemsSource / SelectedItem / SelectedItemCommand
  • ItemsSource 可綁定屬性將會用來設定 Picker 要顯示的所有資料清單來源。
  • SelectedItem 這個可綁定屬性將會當使用者選取的新的資料項目之後,在 ViewModel 內可以透過這個可綁定屬性取得使用者選項的內容值。
  • SelectedItemCommand 可綁定屬性用於綁定當有新的項目被選取的時候,所要執行的 ICommand 命令,這個 ICommand 將會在 ViewModel 內實作出來。
  • 在 BindablePicker 建構式中,定義了這個 Picker 控制項的 SelectedIndexChanged 事件,也就是當這個事件被驅動的時候,就會根據當時所選取的 SelectedIndex 索引值,找到實際的項目內容值,並且設定到 SelectedItem。
  • 這個原始碼中,有許多關於可綁定屬性的定義,這部分可以參考可綁定屬性的做法相關說明。
  • 當 SelectedItem 的值有所變動的時候,會判斷當時是否有綁定 ICommand 物件,若有,則會使用SelectedItemCommand.Execute(value); 執行這個 ICommand 命令,其中,這個 ICommand 命令被呼叫的時候,會將當時選取的項目值,傳遞到 ICommand 內。
    public class BindablePicker : Picker
    {
        public static readonly BindableProperty ItemsSourceProperty = BindableProperty.Create("ItemsSource",
                    typeof(IEnumerable), typeof(BindablePicker), null, propertyChanged: OnItemsSourceChanged);

        public static readonly BindableProperty SelectedItemProperty = BindableProperty.Create("SelectedItem",
                    typeof(IEnumerable), typeof(BindablePicker), null, BindingMode.TwoWay, propertyChanged: OnSelectedItemChanged);

        public static readonly BindableProperty SelectedItemCommandProperty = BindableProperty.Create("SelectedItemCommand", 
            typeof(ICommand), typeof(BindablePicker), null);

        public BindablePicker()
        {
            SelectedIndexChanged += (o, e) =>
            {
                if (SelectedIndex < 0 || ItemsSource == null || !ItemsSource.GetEnumerator().MoveNext())
                {
                    SelectedItem = null;
                    return;
                }

                var index = 0;
                foreach (var item in ItemsSource)
                {
                    if (index == SelectedIndex)
                    {
                        SelectedItem = item;
                        break;
                    }
                    index++;
                }
            };
        }

        public ICommand SelectedItemCommand
        {
            get { return (ICommand)GetValue(SelectedItemCommandProperty); }
            set { SetValue(SelectedItemCommandProperty, value); }
        }

        public IEnumerable ItemsSource
        {
            get { return (IEnumerable)GetValue(ItemsSourceProperty); }
            set { SetValue(ItemsSourceProperty, value); }
        }

        public Object SelectedItem
        {
            get { return GetValue(SelectedItemProperty); }
            set
            {
                if (SelectedItem != value)
                {
                    SetValue(SelectedItemProperty, value);
                    InternalUpdateSelectedIndex();

                    if(SelectedItemCommand!=null)
                    {
                        SelectedItemCommand.Execute(value);
                    }
                }
            }
        }

        public event EventHandler<SelectedItemChangedEventArgs> ItemSelected;

        private void InternalUpdateSelectedIndex()
        {
            var selectedIndex = -1;
            if (ItemsSource != null)
            {
                var index = 0;
                foreach (var item in ItemsSource)
                {
                    if (item != null && item.Equals(SelectedItem))
                    {
                        selectedIndex = index;
                        break;
                    }
                    index++;
                }
            }
            SelectedIndex = selectedIndex;
        }

        private static void OnItemsSourceChanged(BindableObject bindable, object oldValue, object newValue)
        {
            var boundPicker = (BindablePicker)bindable;

            if (Equals(newValue, null) && !Equals(oldValue, null))
                return;

            boundPicker.Items.Clear();

            if (!Equals(newValue, null))
            {
                foreach (var item in (IEnumerable)newValue)
                    boundPicker.Items.Add(item.ToString());
            }

            boundPicker.InternalUpdateSelectedIndex();
        }

        private static void OnSelectedItemChanged(BindableObject bindable, object oldValue, object newValue)
        {
            var boundPicker = (BindablePicker)bindable;
            if (boundPicker.ItemSelected != null)
            {
                boundPicker.ItemSelected(boundPicker, new SelectedItemChangedEventArgs(newValue));
            }
            boundPicker.InternalUpdateSelectedIndex();
        }

    }

在 XAML 內使用新產生的 BindablePicker

想要使用這個新的自訂控制項,您需要宣告一個 XAML 命名空間,在底下,宣告了一個 xmlns:local="clr-namespace:PickerLab" 命名空間。
因此,您可以使用 ` 的方式在 XAML 宣告這個新控制項;在底下的例子中,將透過資料繫結,將上述三個新建立的可綁定屬性,綁定到 ViewModel 內的三個屬性。
例如, Picker 可以選擇的所有清單項目將會透過 ItemsSource="{Binding PickerVM}" 來取得,而使用者選擇完後的資料項目,將會透過 SelectedItem="{Binding PickerSelectedTitle}" 綁定到 ViewModel 內;而要在使用點不同資料之後,執行的 ICommand ,則使用 SelectedItemCommand="{Binding SelectedIndexChangedCommand}" 方式來宣告。
<?xml version="1.0" encoding="utf-8" ?>
<ContentPage xmlns="http://xamarin.com/schemas/2014/forms"
             xmlns:x="http://schemas.microsoft.com/winfx/2009/xaml"
             xmlns:prism="clr-namespace:Prism.Mvvm;assembly=Prism.Forms"
             xmlns:local="clr-namespace:PickerLab"
             xmlns:behaviors="clr-namespace:Behaviors;assembly=Behaviors"
             prism:ViewModelLocator.AutowireViewModel="True"
             x:Class="PickerLab.Views.MainPage"
             Title="MainPage">
    <StackLayout HorizontalOptions="Fill" VerticalOptions="Center">
        <Label Text="{Binding Title}" HorizontalOptions="Center"/>
        <!--https://developer.xamarin.com/api/type/Xamarin.Forms.Picker/-->
        <local:BindablePicker 
            ItemsSource="{Binding PickerVM}"
            HorizontalOptions="Fill"
            HeightRequest="34"
            SelectedItem="{Binding PickerSelectedTitle}"
            SelectedItemCommand="{Binding SelectedIndexChangedCommand}">
        </local:BindablePicker>
        <Label Text="{Binding PickerSelectedTitle}" HorizontalOptions="Center"/>
    </StackLayout>
</ContentPage>

Visual Studio for Android Emulator Hyper-V CPU 相容性問題

當您在安裝與使用 Visual Studo for Android Emulator 的時候,會遇到無法正常啟動與在模擬器上進行除錯,這個時候,您可能需要將該模擬器的處理器之相容性的 轉移至使用不同處理器版本的實體電腦 檢查盒打勾起來,這樣,模擬器才可以正常啟動。
enter image description here
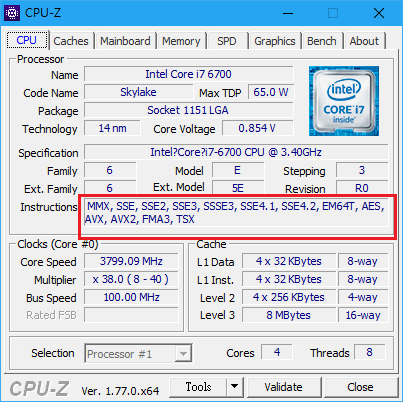
如果不打勾,那在同一台電腦建出來的VM 就會完整使用這台電腦所擁有的指令集…。但是這個VM 如果被複製或整台被CLONE 到不同世代或同世代,但卻指令集有少或版本差異,就有可能無法”開機”或把這個VM 的處理器效能作所謂的完全發揮。
這VM 並不是使用自己電腦出來的VM,而是從別地方匯入,而當初做這個VM的電腦CPU 是不同世代的INTEL CPU 或又是您的電腦主機板BIOS功能沒有被開啟跟當時作的母機設定一致,因此,需要將這個功能開啟。
從下兩圖,可以看出,不同 CPU 可以使用的指令集會有所差異
enter image description here

2016/10/14

Xamarin.Forms 顯示具有圓形遮罩 Mask 的圖片

有些時候,為了程式畫面美觀,在進行視覺設計的時候,會需要把原來正方形或者長方形的圖片,希望能夠透過一個圓形遮罩(Mask),把圖片以圓形的方式來處理;可是,Xamarin.Forms 預設提供顯示的圖片,僅僅提供方形的圖片顯示。
ImageCircleLab
參考專案

加入 NuGet 套件 ImageCircle

為了要能夠做到這樣的事情,您僅需要在整個方案內的每個專案內,都加入這個 NuGet 套件Xam.Plugins.Forms.ImageCircle。不過,您需要在所有特定平台專案內的 Xamarin.Forms.Init(); 程式碼之後,加入這個程式碼 ImageCircleRenderer.Init();
Xamarin.Forms.Init();//platform specific init
ImageCircleRenderer.Init();

如何使用 ImageCircle

  • 首先,需要宣告這個套件的命名空間 xmlns:LocalImage="clr-namespace:ImageCircle.Forms.Plugin.Abstractions;assembly=ImageCircle.Forms.Plugin.Abstractions"
  • 要使用 ImageCircle 只有三個屬性與 Image 不同,可以參考底下 XAML 程式碼
<?xml version="1.0" encoding="utf-8" ?>
<ContentPage xmlns="http://xamarin.com/schemas/2014/forms"
             xmlns:x="http://schemas.microsoft.com/winfx/2009/xaml"
             xmlns:prism="clr-namespace:Prism.Mvvm;assembly=Prism.Forms"
             xmlns:LocalImage="clr-namespace:ImageCircle.Forms.Plugin.Abstractions;assembly=ImageCircle.Forms.Plugin.Abstractions"
             prism:ViewModelLocator.AutowireViewModel="True"
             x:Class="ImageCircleLab.Views.MainPage"
             Title="MainPage">
    <StackLayout HorizontalOptions="Center" VerticalOptions="Center">
        <Label Text="{Binding Title}" />
        <Image
            Source="platformImage.jpg"
            Aspect="AspectFill"
            WidthRequest="200"
            HeightRequest="200"
            />
        <LocalImage:CircleImage
            Source="platformImage.jpg"
            Aspect="AspectFill"
            BorderColor="Green"
            BorderThickness="5"
            BackgroundColor="Transparent"
            WidthRequest="200"
            HeightRequest="200"
            />
    </StackLayout>
</ContentPage>

2016/10/13

Xamarin.Forms 在 Picker 內使用 x:String 定義要選取的清單項目

當在 XAML 下使用這個 Picker 控制項,若您的可以選取的項目內容是固定的,您可以不需要使用到 Items這個屬性來設定 Picker 可以選擇的內容;這個時候,您可以透過 Picker.Items 直接設定這些項目內容,如底下宣告方式。
要特別注意, x:String 的使用,有大小寫區分。
範例專案可以參考
        <Picker HorizontalOptions="Fill">
            <Picker.Items>
                    <x:String>Red</x:String>
                    <x:String>Blue</x:String>
                    <x:String>Green</x:String>
                    <x:String>Yellow</x:String>
                    <x:String>Purple</x:String>
            </Picker.Items>
        </Picker>

2016/10/09

Xamarin.Forms 在 ListView 內,若有宣告 ViewCell.ContextActions 無法在 iOS 正常執行

當您開發 Xamarin.Forms 應用程式,所有的程式碼都有在 Android 平台下執行過,都可以正常運行,不過,同樣的 Xamarin.Forms 檔案,卻無法在 iOS 平台下執行;經過排除方法,找到,當 ListView 內有宣告ViewCell.ContextActions 互動功能表的時候,就會發生應用程式卡住的問題,把ViewCell.ContextActions XAML 宣告之後,這個頁面就可以正常運行。
會發生這個問題,是因為您的 Xamarin.Forms 版本需要升級。若您的 Xamarin 是安裝到 4.2.0.680 版本,而 Xamarin.iOS 是 10.0.0.6 版本,並且您專案裝的 Xamarin.Forms NuGet 套件安裝的是 2.3.1.114 版本,就會發生這樣的情況。
AboutVS
解決方式,就是將您方案中所有的 Xamarin.Forms NuGet 套件 2.3.2.127 以上版本,就可以解決此一問題。